

Liam's Hobby Room | 25 days ago

Airbrushing for Beginners 1

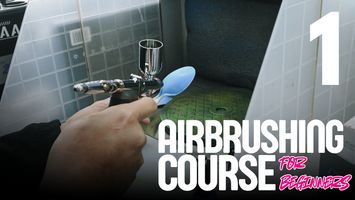
New to airbrushing? You’re in the right place. In Episode 1 of our Beginner Airbrush Course, Liam covers the basics you need before you start spraying—from choosing your first airbrush and compressor to setting up a safe workspace and understanding ventilation. Let’s get started!

Getting Started With an Airbrush

Airbrushing is one of the most useful skills you can add to your scale modeling hobby. It can help you achieve smooth, consistent coats of paint, subtle shading and lighting effects, and a level of control that can be difficult to achieve with a traditional brush.


But if you've never used an airbrush before, getting started can feel a little intimidating.

What airbrush should you buy? Do you need a compressor? What about ventilation? Which paints can you use? And what happens when something inevitably goes wrong?


That's what this four-part beginner airbrush course is here to help with.

Episode 1: Orientation

In this first episode, we're keeping things simple. Before we start spraying paint, we'll look at the basic equipment you'll need, some important safety considerations, and how to choose an airbrush and compressor that you can grow into.


Why Use An Airbrush?

Airbrushing opens up a huge range of possibilities for modelers.


With practice, an airbrush can give you excellent control over how much paint you're applying and where you're applying it. It's particularly useful for achieving smooth base coats, gradients, shading, highlights, weathering effects and other techniques. It's also a great way to get more consistent results across larger surfaces.


However, airbrushing can seem complicated when you're first starting out. There are specialized tools, different types of paint, pressure settings, cleaning procedures and safety considerations to learn.


That's completely normal. The goal of this series isn't to turn you into an expert overnight. Instead, we're going to establish the fundamentals and give you the knowledge you need to start practicing confidently.

What Do You Need to Start Airbrushing?

For this course, we're focusing on the type of setup most commonly associated with scale modeling:


-A dual-action, gravity-fed airbrush

-An air compressor

-An air hose

-Appropriate model paints

-A spray booth or suitable ventilation setup

-Appropriate personal protective equipment (PPE)

-Cleaning supplies


We'll cover paints in much more detail in Episode 2, while actual airbrush operation and cleaning will be explored later in the series.

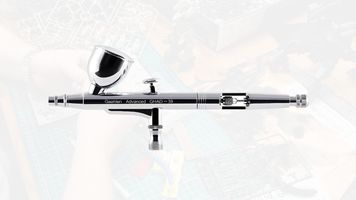
An image of the Gaahleri GHAD-39 airbrush.An image of the Gaahleri GHAD-39 airbrush.

A Gaahleri GHAD-39 Gravity-Fed Dual Action Airbrush is the most affordable option for a beginner.

The Airbrush

A dual-action, gravity-fed airbrush is a great place to start for scale modeling.


"Gravity-fed" means the paint cup sits above the airbrush and paint is fed into the brush by gravity. "Dual-action" means the trigger controls both airflow and paint flow, giving you a high degree of control once you've learned how to use it.


Airbrushes are precision instruments, so quality matters. There are plenty of inexpensive airbrushes available online, including kits bundled with compressors. While these can look appealing to beginners, replacement parts and build quality can become a problem.


The needle, nozzle and other internal components are finely manufactured. If something gets damaged, being able to find replacement parts is important. For that reason, consider choosing a reputable manufacturer with readily available parts and support.


Some brands worth considering include Iwata, Paasche, Harder & Steenbeck, and Gaahleri. Beginner-friendly options include the Gaahleri GHAD-39, Neo for Iwata, Iwata HP-CS Eclipse, and Paasche TG-100.


Choosing an Air Compressor

An airbrush needs a steady supply of compressed air, which means you'll also need an air compressor.


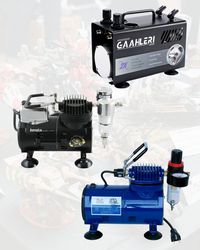
For scale modeling, a dedicated hobby compressor is generally the simplest choice. Hardware-store compressors can work in some situations, but they may require different hose fittings or adapters and can introduce unnecessary complications when you're just learning. There are two main types to consider: tank compressors and tankless compressors.


When choosing between a tank and tankless compressor, think about how often you'll be using your airbrush, how much space you have available, your budget, and how important noise is in your workspace.

Tank Compressors

A compressor with an air tank fills with compressed air before supplying air to your airbrush. Once the tank reaches pressure, the compressor switches off until more air is needed. This gives the motor a chance to cool down.


-Advantages generally include:

-Longer operating periods

-More consistent air delivery

-Automatic rest periods for the compressor

-Greater control over operating pressure


The trade-off is that tank compressors are generally larger and more expensive than tankless units. Some are also quite loud. For scale modeling, examples include the Gaahleri GT-918 Dual Drive Compressor, Iwata Sprint Jet, and Paasche D500SR.

Tankless Compressors

Tankless compressors are typically smaller, more portable and more affordable. Instead of filling an air tank, the compressor continuously compresses air while you're spraying.


Because the motor is running more or less continuously, these compressors are generally better suited to lighter-duty applications and shorter airbrushing sessions.


They can be an excellent budget-friendly way to get started, particularly if space is limited.


Examples include the Neo Air, Gaahleri Serenair, and Gaahleri TurboX Mini.

Airbrush Safety & Ventilation

Before buying an airbrush, there's one question you should answer first:


Where are you going to spray?

Airbrushing creates airborne paint particles and, depending on the type of paint and products you're using, potentially fumes that you don't want to breathe. A proper ventilation setup is therefore one of the most important parts of an airbrushing workspace.


Use a Spray Booth

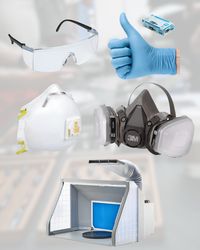
A hobby spray booth is designed to capture airborne paint particles and help remove fumes from your workspace. Ideally, a spray booth should be properly vented to the outside. A flexible dryer hose can commonly be connected to the booth and directed through a suitable window or exterior vent. You can purchase a purpose-built hobby spray booth or research how to build one yourself. Whatever setup you choose, the important thing is to take ventilation seriously.


Your workspace should also take other people and pets into consideration. Airbrushing isn't something you should casually do in an occupied living space without thinking about where airborne particles and fumes are going.

Don't Forget PPE

Depending on the type of paint you're spraying, you may also need appropriate respiratory protection and other PPE.

Different paints have different safety requirements, so always follow the manufacturer's safety instructions and use the appropriate protection for the products you're working with.


We'll explore different paint types and their safety considerations in Episode 2.


How Much Does It Cost to Start Airbrushing?

One of the biggest concerns for new airbrush users is cost.


It's easy to look at everything you might eventually want—a high-end airbrush, compressor, spray booth, paints, cleaning products, accessories and more—and assume that you need to buy everything immediately. You don't.


What you should think about is building a setup that suits your needs and gives you room to learn.


A good-quality beginner airbrush and a suitable hobby compressor will take you a long way. You can add additional tools and accessories as you discover what techniques you enjoy and what your particular workflow requires.


The goal isn't to buy the most expensive equipment. The goal is to buy the right equipment.


The Most Important Tool is Practice

It's easy to focus on equipment when you're getting started, but your most important airbrushing tool isn't something you can buy. It's practice.


Your first few attempts might not look great. You may apply too much paint, too little paint, hold the airbrush too close, spray too far away, or end up with paint somewhere you absolutely did not intend for it to go.


That's okay! Every experienced modeler started somewhere.


Airbrushing is a skill, and like any hobby skill, you'll improve by practicing, experimenting and learning from mistakes. Don't be afraid to make a mess while you're learning.

Take your time, be patient with yourself, and don't hesitate to ask questions. Your local hobby shop can be an excellent resource when you're stuck or unsure about something.

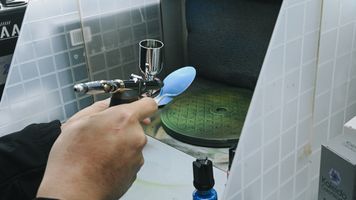
Spraying paint on a plastic spoon.Spraying paint on a plastic spoon.

Practice spraying on any bits of spare plastic you can get your hands on, like clean plastic spoons!

What's Next?

Now that we've covered the basic equipment, workspace and safety considerations, it's time to talk about one of the most important parts of airbrushing: Paint!


In Episode 2 of our Beginner Airbrush Course, we'll look at the different types of paint available to hobbyists, which paints are suitable for airbrushing, how they differ, and what you need to know to use them safely and effectively.


We'll continue building your knowledge one step at a time so that, by the end of the series, you'll have the foundation you need to confidently pick up an airbrush and start painting.


Until then, happy building!

— Liam's Hobby Room × BC Hobbies


Every skill starts somewhere!

Liam's Hobby Room

More Posts

Airbrushing for Beginners 4Airbrushing for Beginners 4
Airbrushing for Beginners 4

Welcome back to my Airbrushing Course for Beginners (the blog version!), brought to you by BC Hobbies. I’m Liam and this is my hobby…blog? In this final episode of the series we’re going to cover one of the most important things you need to know about operating an airbrush:


How to clean one properly.


Cleaning is such an important part of airbrushing that I seriously considered making this the first episode. In the end, though, I think it makes more sense after you’ve built some familiarity with the tool, the paints you’re using, and how the airbrush actually operates.


A common misconception is that spraying a little thinner through your airbrush is enough to clean it. It isn’t. The real secret to cleaning an airbrush properly is understanding the type of paint you’ve been using and how that paint behaves once it begins to dry or cure. A lot of what we learned back in Episode 2 will come in handy here, but I’ll go over the important parts again as we need them.
Airbrushing for Beginners 3Airbrushing for Beginners 3
Airbrushing for Beginners 3

Hey there, my name is Liam and this is my hobby room. Welcome back to Episode 3 of my Airbrushing Course for Beginners (the blog version!), brought to you by BC Hobbies.


In Episode 2, we learned about the different types of paint you’ll be using, how to thin them properly, and what your paint should look like when it sprays.


Now we’re getting into the actual airbrushing. As I mentioned back in Episode 1, we’re working under the assumption that you have a dual-action, gravity-fed airbrush and an air compressor.


The goal of this lesson is to help you get comfortable using your airbrush so you can have the best possible experience when you start painting. By the end, you’ll understand how to control the trigger, how to set up your compressor, what to look for while spraying, and how to avoid some of the most common beginner mistakes.


Let’s start by taking a closer look at the airbrush itself.

Airbrushing for Beginners 2Airbrushing for Beginners 2
Airbrushing for Beginners 2

In Episode 1, we looked at an overview of the hobby so you could build some familiarity with the tools and general concepts involved in airbrushing. This time, we’re getting into one of the most intricate parts of the hobby: paint.


We’ll look at the main types of hobby paint, which ones are easiest for beginners, how to thin them properly, and what safety equipment you’ll need while spraying. There’s a lot of paint out there, but once you understand a few basic concepts, choosing and using it gets much easier.

<p>About This Blog</p><p>About This Blog</p>

About This Blog

A place to learn, build, and get better at the hobbies you love. We share practical tips, techniques, beginner guides, community projects, events, and helpful how-tos—with the occasional look at tools and products that can make the job easier.