Liam's Hobby Room | 12 days ago

Airbrushing for Beginners 4

Welcome back to my Airbrushing Course for Beginners (the blog version!), brought to you by BC Hobbies. I’m Liam and this is my hobby…blog? In this final episode of the series we’re going to cover one of the most important things you need to know about operating an airbrush:


How to clean one properly.


Cleaning is such an important part of airbrushing that I seriously considered making this the first episode. In the end, though, I think it makes more sense after you’ve built some familiarity with the tool, the paints you’re using, and how the airbrush actually operates.


A common misconception is that spraying a little thinner through your airbrush is enough to clean it. It isn’t. The real secret to cleaning an airbrush properly is understanding the type of paint you’ve been using and how that paint behaves once it begins to dry or cure. A lot of what we learned back in Episode 2 will come in handy here, but I’ll go over the important parts again as we need them.

Cleaning With a Brush

One of the most useful tools you can own is a small, long-bristled brush reserved specifically for cleaning your airbrush. Use it to work cleaner into dirty threads, internal passages and awkward areas that are difficult to reach.


I generally prefer a brush over cotton swabs for cleaning internal mechanisms because cotton fibres can snag on small parts and leave debris behind. Cotton swabs are still useful for cleaning areas like the exposed needle tip or nozzle cap, but a dedicated cleaning brush is one of the best tools you can have on your bench.

Diagnosing Your Airbrush

Airbrush troubleshooting is usually simpler than it first appears. Start by asking yourself what the airbrush is actually doing.


Is air flowing normally?


Is the airflow weak?


Is there no airflow at all?


Is paint flowing properly?


Is something sputtering, sticking or refusing to move?


Most airbrush problems come down to dried paint, a blockage, or paint getting somewhere inside the airbrush where it shouldn’t be. When in doubt, the best place to start is usually a thorough cleaning.


Episode 4: Cleaning Your Airbrush

Time to learn the most important thing about using an airbrush: cleaning it! This video clearly explains the cleaning process for your airbrush's guaranteed longevity.

Thinners & Cleaners

Paint thinner and paint cleaner are not the same thing. A paint thinner changes the consistency of paint so it can flow and spray properly. A paint cleaner is designed to break down paint residue and make it easier to remove. Do not thin your paint with cleaner. For cleaning, make sure you’re using something appropriate for the type of paint you sprayed.


Water-Soluble Acrylic Paint

If you’re using water-soluble acrylics, a dedicated water-based acrylic cleaner works well while the paint is still fresh. Once acrylic paint begins drying or curing, however, it becomes much harder to remove.


Isopropyl alcohol can be very effective for breaking down stubborn water-based acrylic residue, provided the parts you’re cleaning are compatible with it. The important thing is not to let paint build up in the first place. Regular cleaning is much easier than trying to remove layers of dried acrylic later.


Solvent-Based Paint

If you’re spraying enamels, alcohol-based acrylics such as Tamiya Acrylics, or lacquer paints, use an appropriate solvent-based cleaner. Lacquer thinner is particularly powerful and can remove a wide variety of hobby paints. It is also something you need to handle carefully. When cleaning with strong solvents, wear the appropriate respirator, gloves and eye protection, and make sure your extractor fan is running.


Avoid soaking components unnecessarily, and do not expose rubber seals or O-rings to lacquer thinner unless you know they are chemically resistant. For most cleaning jobs, a few minutes is more than enough.


Performing a Working Clean

A "working clean" is a quick cleaning routine you can perform while you’re still painting. You might do this between colours, after noticing a little tip dry, or whenever the airbrush starts behaving differently.


1 - First, empty the colour cup.


2 - Add a small amount of your dedicated

paint cleaner, roughly a quarter of the cup or less.


3 - Create a backflow using the technique we learned earlier in the course and allow the cleaner to bubble through the colour cup for a few seconds. This helps loosen paint inside the front section of the airbrush.


4 - Check your colour cup. If the cleaner becomes very dirty, I recommend dumping it rather than spraying all of that paint residue through the nozzle.


5 - Add a little more cleaner.


6 - Next, loosen the needle chuck at the rear of the airbrush and gently pull the needle back a small amount.


7 - Repeat the backflow. Because the needle is now slightly retracted, you may notice more vigorous bubbling inside the colour cup. Keep your model parts away from the area while doing this and continue wearing gloves and eye protection.


8 - Once the cleaner is relatively clear, spray the remaining liquid through the airbrush.


9 - Reseat the needle carefully and tighten the needle chuck.


10 - Finally, clean the exposed needle tip and nozzle cap gently using a cotton swab with the appropriate cleaner or thinner. At this point, you should be ready to continue painting.

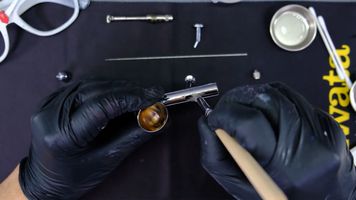
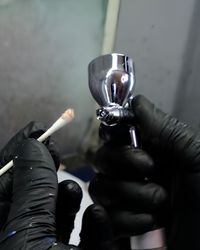
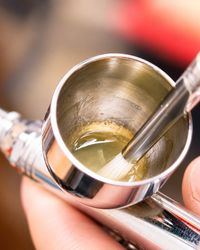
Cleaning an airbrush with cleaner and a brush.Cleaning an airbrush with cleaner and a brush.

An airbrush is only ever as good as it is clean! Doing a full clean after a long painting session will help your airbrush perform well.

Full Disassembly Cleaning

At the end of a painting session, I recommend performing a more thorough clean. When you’re new to airbrushing, doing this regularly also helps you learn how your airbrush actually goes together. Every airbrush should come with an exploded diagram in its manual, and most manufacturers also make them available online. Use that diagram!


There are a lot of small components inside an airbrush, and some of them are very easy to lose. Work over a tray, shallow container or clean cloth so that anything you remove has somewhere safe to go. It’s important to remember that if you’re using solvents to clean, wear gloves!


When you first start learning the process, lay each component out neatly in the order you remove it. Be especially careful with the needle and nozzle, as these are extremely precise parts and can be damaged easily. If your airbrush uses removable O-rings or seals in areas you’re cleaning with aggressive chemicals, remove them and set them aside.


Now clean the airbrush piece by piece.


Apply the appropriate cleaner to the components and use your cleaning brush to gently remove paint residue. If a metal part is particularly dirty, you can let it sit in an appropriate cleaner briefly to loosen the paint. There should rarely be any need for long soaking times. If you perform a proper cleaning after every painting session, heavy paint build-up should never become a major problem.


First Inspect & Reassemble

Once everything is clean, stop and inspect the parts carefully. If you can still see dried paint, the component isn’t clean yet. This is one of the biggest things I’ve learned from dealing with airbrush problems at BC Hobbies. My colleagues and I have received plenty of airbrushes that customers believed were broken. The overwhelming majority of the time, the actual problem was dried paint or residue somewhere inside the airbrush.


Once your parts are clean, remove any excess cleaner and allow them to dry. Replace your O-rings and seals. If your airbrush manufacturer recommends lubricant, apply a very small amount of proper airbrush lubricant to the appropriate moving or threaded parts. You really do not need much, wiping some away is probably necessary. If you’ve got visible globs of lubricant, that’s way too much.


Then reassemble the airbrush using the exploded diagram in your manual. Your airbrush should feel smooth and responsive. A well-maintained airbrush should perform very close to the way it did when it came out of the box, and if you keep up these cleaning habits, it will do so for your entire lifetime, barring physical damage to its mechanisms.


Fixing Common Issues

There are a handful of issues you’ll probably encounter eventually. The good news is that most of them are fairly easy to diagnose. I answer a lot of airbrush-related questions at work. One thing I’ve learned is that most problems people experience with their airbrushes can be solved with a good cleaning. People are often surprised when I show them the results. Airbrushes are precise tools, and nobody automatically knows how to maintain one the first time they pick it up.


Learning how to clean the tool is part of learning how to use it. Once you develop good maintenance habits, troubleshooting becomes much easier.


Paint Spatter

Paint spatter is one of the most common airbrushing problems. If your airbrush suddenly starts producing inconsistent dots or larger droplets of paint, the nozzle may be partially clogged. This is especially common with water-soluble acrylics because they dry quickly and can form semi-cured clumps. Start by emptying and cleaning the colour cup. If the problem continues, clean the nozzle and front end of the airbrush as you would during a full disassembly. A clean nozzle should restore a consistent spray pattern.


Constant Airflow

If air continues flowing even when you aren’t touching the trigger, the air valve is probably sticking. Paint or cleaner may have worked its way into the valve assembly, or the mechanism itself may simply need cleaning or lubrication. Paint should normally remain around the colour cup, paint channel and nozzle area. However, because the needle moves through the body of the airbrush, contamination can occasionally travel farther backwards than intended. If the trigger isn’t shutting off the airflow properly, inspect and clean the air valve mechanism.


No Airflow

If no air comes out at all, listen carefully when you press the trigger. If you can hear air hissing inside the airbrush but nothing is reaching the front, you may have a blockage somewhere between the air valve and nozzle. If you hear nothing, the problem may be in the air valve itself, compressor connection or another part of the air supply. Check your hose connections first. I know it seems obvious, but proveably ruling out the obvious is the best way to begin troubleshooting. If those are fine, clean and inspect the airbrush.

Stuck Components

Everything on a properly maintained airbrush should move smoothly. The trigger should move freely. The needle should slide without excessive resistance. Caps and threaded components should unscrew without needing excessive force. If something that normally moves freely suddenly feels stuck, dried paint is probably involved. Do not force delicate components. Clean the area instead. A stuck nozzle, needle or needle chuck can be damaged very easily if you simply try to overpower it.


Tip Dry

Tip dry happens when paint begins drying on the exposed tip of the needle. This is particularly common with water-soluble acrylics. You may notice your spray pattern becoming inconsistent, the paint beginning to spatter, or the airbrush gradually becoming less responsive. Fortunately, this is usually easy to fix. Put a little of the appropriate cleaner or thinner on a cotton swab and very gently wipe the dried paint from the needle tip and inside the nozzle cap. Be careful around the needle. It is extremely easy to bend the very tip if you catch it with the cotton swab or wipe too aggressively. Once the dried paint is gone, your spray pattern should return to normal.

Take Care of Your Equipment

Precision tools require precision cleaning!

An airbrush can completely change what you’re able to accomplish in the hobby. You can produce smoother finishes, cleaner gradients, faster base coats, subtle shading and effects that would be extremely difficult to achieve any other way. It’s also an investment, so take care of it and it will take care of you!


A good airbrush can last an incredibly long time if you clean it properly, replace normal wear components when necessary, and avoid forcing delicate parts.

Your Journey Begins

Over the course of this series, we’ve covered the fundamental building blocks of airbrushing.


We learned what equipment you need and how a basic airbrush setup works. We looked at hobby paints, different paint types, thinning and safety. We learned how to control a dual-action airbrush and actually apply paint. And now we’ve covered how to clean, maintain and troubleshoot your equipment.


Those are the foundations. There is still an enormous amount you can learn from here, but most of it comes down to one thing: Practice!


My motto is practice makes proficiency. I don’t know if someone famous said that already, but if they haven’t then jeez, what a great quote if I do say so myself (which I clearly do!)


You don’t have to be perfect. You just have to keep using the tool. Every time you paint, you’ll become a little more comfortable with trigger control, paint consistency, distance, pressure and maintenance.


I’ve tried to keep this course as short and practical as possible while giving you enough information to actually get started. And if you do run into trouble, talk to your local hobby shop.


We’re here to help you get the most out of your hobby. After all, it’s your time. I want you to enjoy every second of it.


Happy painting!

— Liam's Hobby Room × BC Hobbies

Every skill starts somewhere!

Liam's Hobby Room

More Posts

Airbrushing for Beginners 3Airbrushing for Beginners 3
Airbrushing for Beginners 3

Hey there, my name is Liam and this is my hobby room. Welcome back to Episode 3 of my Airbrushing Course for Beginners (the blog version!), brought to you by BC Hobbies.


In Episode 2, we learned about the different types of paint you’ll be using, how to thin them properly, and what your paint should look like when it sprays.


Now we’re getting into the actual airbrushing. As I mentioned back in Episode 1, we’re working under the assumption that you have a dual-action, gravity-fed airbrush and an air compressor.


The goal of this lesson is to help you get comfortable using your airbrush so you can have the best possible experience when you start painting. By the end, you’ll understand how to control the trigger, how to set up your compressor, what to look for while spraying, and how to avoid some of the most common beginner mistakes.


Let’s start by taking a closer look at the airbrush itself.

Airbrushing for Beginners 2Airbrushing for Beginners 2
Airbrushing for Beginners 2

In Episode 1, we looked at an overview of the hobby so you could build some familiarity with the tools and general concepts involved in airbrushing. This time, we’re getting into one of the most intricate parts of the hobby: paint.


We’ll look at the main types of hobby paint, which ones are easiest for beginners, how to thin them properly, and what safety equipment you’ll need while spraying. There’s a lot of paint out there, but once you understand a few basic concepts, choosing and using it gets much easier.

Airbrushing for Beginners 1Airbrushing for Beginners 1
Airbrushing for Beginners 1

New to airbrushing? You’re in the right place. In Episode 1 of our Beginner Airbrush Course, Liam covers the basics you need before you start spraying—from choosing your first airbrush and compressor to setting up a safe workspace and understanding ventilation. Let’s get started!

<p>About This Blog</p><p>About This Blog</p>

About This Blog

A place to learn, build, and get better at the hobbies you love. We share practical tips, techniques, beginner guides, community projects, events, and helpful how-tos—with the occasional look at tools and products that can make the job easier.