Liam's Hobby Room | 12 days ago

Airbrushing for Beginners 3

Hey there, my name is Liam and this is my hobby room. Welcome back to Episode 3 of my Airbrushing Course for Beginners (the blog version!), brought to you by BC Hobbies.


In Episode 2, we learned about the different types of paint you’ll be using, how to thin them properly, and what your paint should look like when it sprays.


Now we’re getting into the actual airbrushing. As I mentioned back in Episode 1, we’re working under the assumption that you have a dual-action, gravity-fed airbrush and an air compressor.


The goal of this lesson is to help you get comfortable using your airbrush so you can have the best possible experience when you start painting. By the end, you’ll understand how to control the trigger, how to set up your compressor, what to look for while spraying, and how to avoid some of the most common beginner mistakes.


Let’s start by taking a closer look at the airbrush itself.

Episode 3: Using an Airbrush

Using an airbrush requires a lot of consideration, and the hardest part of the skill curve is getting used to handling one. Here, you can begin to develop your techniques and practice, practice, practice!

Anatomy of an Airbrush

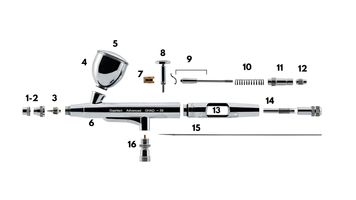
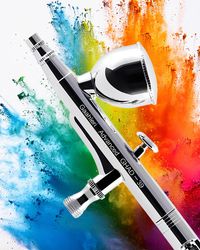
Every airbrush has a particular assembly list found in the included instruction manual and easily found online, but they follow the same design philosophy. The following is an example of a gravity-fed, external mix, double action airbrush (specifically, the extremely affordable Gaahleri GHAD-39). The following is an over-explained breakdown of every component of your airbrush. Each component serves its own purpose to work in concert with the others!

An exploded view of an airbrush for the purposes of describing its components.An exploded view of an airbrush for the purposes of describing its components.

The anatomy of an airbrush, expanded upon below with descriptions for each numbered component.

Airbrush Component List

1 - 2 Needle & Nozzle Cap: Serves a dual purpose of protecting the needle and directing the spray pattern. Sometimes the needle cap, which sits at the spraying end is combined with the nozzle cap just behind it.


3 - Nozzle: Sometimes called a tip or cone, the nozzle is one of the most important parts of an airbrush. Like needles, nozzles wear out over time and will need to be replaced. The nozzle is a very delicate component, and can easily be damaged beyond repair by feeding the needle through the airbrush too forcefully.


4 - Colour Cups: The Gaahleri GHAD-39 features two interchangeable colour cups, differing only in size. Each cup comes with an O-ring to ensure air and paint do not leak out of the cup’s connection point. Generally, I’d recommend just leaving the larger cup attached unless you know of a specific reason why you want the smaller colour cup attached.


5 - Colour Cup Lid: A metal lid that securely fits the colour cup via a friction fit. This prevents spillage, which you’ll want to avoid for two reasons: one is that it may stain whatever you spill on, but the more important reason is due to the smooth metal curves of your airbrush, the spilled paint will glide down, and flow along the bottom of your airbrush towards the tip. 


Please note: Because you are spraying at a downward angle, if the paint spills and glides to the needle crown/cap it will be propelled forward by your airflow (without being atomized within the airbrush) and spit all over your project. Or your hands. Or both. 


6 - Airbrush Chassis: The main body of your airbrush, which houses its internal mechanism and connects the whole shebang together.

7 - Packing Set: This is essentially a special-purpose O-ring and screw that prevents paint from flowing back into the airbrush past this point by creating a firm seal.


8 - Main Lever/Trigger: In a dual action system, the trigger has two functions. By holding it down it opens the air valve, letting the compressed air flow through parts 6-3-2-1 in that order. By pulling the trigger back, the mechanism moves the airbrush needle to allow the thinned paint to flow down through the aperture at the bottom of the color cup, mix with the air and atomize.


9 - Trigger Housing: Made up of the needle chucking guide and auxiliary lever. It sets the needle and “guides” it into the correct position, ensuring that it always moves correctly. The auxiliary lever allows more control over the back-and-forth motion, reducing the amount of movement needed to pull the trigger.


10 - Needle Spring: Allows the needle to slide back into place automatically, via the tension in the spring, which plugs the aperture when at rest and allows for better control of paint flow when spraying. Without this, one would have to manually move your needle back and forth. Springs lose retention over time and should be replaced when they begin to lose it.


11 - Spring Guide: This keeps the spring in the optimal position as well as secures all prior components in place via a screw, keeping the housing together.


12 - Needle Chucking Nut: A retention nut that screws on and keeps your needle in place. By gripping onto the needle via the rear of the trigger housing, it allows your needle to slide back-and-forth via manipulation of the main lever/trigger.


13 - Handle: A smooth section to aid in comfort while spraying and protection of the internal mechanisms. I generally leave this off while spraying depending on the job at hand. Uses an O-ring that keeps the handle airtight and secured. 


14 - Fluid Control knob: Most dual action gravity fed airbrushes include this knob. It attaches to the back of the handle, and allows you to manually set the maximum distance the needle can slide back, therefore limiting the amount of paint released while spraying.


15 - Needle: Extremely pointy and delicate. The slightest drop or careless accidental impact to the needle cap/crown of your airbrush may bend the needle tip. Sometimes you can gently bend it back into place, but this is easy to get wrong and will sometimes result in snapping part of the needle off. A bent needle tip, however infinitesimal, will affect the angle, pattern and quality of your spray. You cannot spray with a broken needle.


16 - Air Valve w/ Spring and O-ring: Manipulated by the bottom of the main lever/trigger pressing against it to release compressed air into the brush. The included O-ring prevents compressed air from leaking out of the air valve, ensuring it travels up into the brush for its intended function to deliver to correct PSI.

Operating Your Airbrush and Compressor

Before putting any paint into your airbrush, let’s learn how the trigger works.


Turn on your compressor. If you’re using a compressor with an air tank, give it a moment to fill and reach pressure. For beginners, a good starting point is around 18 PSI. There are plenty of reasons why you might spray at a lower or higher pressure, and most hobby airbrushing happens somewhere in the general range of about 15 to 30 PSI, but we don’t need to worry too much about that yet. For now, 18 PSI is a perfectly reasonable place to start.


If you’re using a tankless compressor, it will usually be ready to go almost immediately. Depending on the model, it may also have preset pressure settings rather than a traditional regulator.


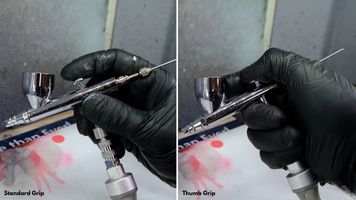
Now take a look at how you’re holding the airbrush. The standard grip is similar to holding a pen, with your index finger resting on the trigger. Some people prefer to use their thumb on the trigger instead. There’s nothing wrong with that if you find it more comfortable.


Press the trigger straight down. You should hear air begin to hiss through the airbrush. If the airbrush is permanently hissing even when you aren’t pressing the trigger, that usually means the air valve is sticking and may need to be cleaned.


Now imagine that there’s paint inside the colour cup. While continuing to press downward for air, slowly pull the trigger backwards. The farther back you pull, the more paint the airbrush releases. That’s really the basic principle of a dual-action airbrush: Press down for air. Pull back (slowly) for paint. The key word here is slowly.


Airbrushing is mostly an exercise in control, patience and gradual application. You generally don’t want to slam the trigger all the way back and flood the surface with paint. Small movements give you much more control. Now we’re ready to start painting!

An image showing the different grip styles of holding an airbrush.An image showing the different grip styles of holding an airbrush.

Depending on what's comfortable for you, you can use your airbrush in a variety of ways. You'll get used to it eventually!

Adding Paint to Your Airbrush

Before you begin, make sure your air hose is securely connected between your airbrush and compressor. Turn on your spray booth or extractor fan. Put on the appropriate mask or respirator for the type of paint you’re using and make sure it properly covers your nose and mouth. Gloves and eye protection should also be worn.


Now prepare your paint. Some paints settle while they sit, so they may need to be mixed before use. Shake or stir the paint according to the manufacturer’s instructions until the colour and consistency are uniform. If you’re using paint from a dropper bottle, shake it thoroughly. For paint in a glass jar or similar container, you may want to stir it using a suitable mixing stick.


When you’re starting out, there’s no reason to fill your entire colour cup. Use a small amount. Add just enough paint to comfortably cover the area you’re working on. From there, add the appropriate thinner.


As we discussed in Episode 2, a general starting point for many water-soluble acrylic paints is roughly two parts paint to one part thinner, while lacquer paints may be closer to one part paint to one part thinner.


These are only starting points. Different brands, colours and environmental conditions can change how much thinner you need. What matters is how the paint sprays!


You can mix your paint and thinner directly inside the colour cup using the backflow technique we learned in Episode 2. Cover the front of the airbrush with your gloved finger or silicone cap, press down for air, and gently pull the trigger backwards. The air will bubble backwards through the colour cup and mix your paint and thinner together. Do this for a few seconds until the mixture is uniform.


If you’re making a custom colour or preparing a larger quantity of paint, I recommend mixing it in a separate bottle first. That way you can keep the colour consistent throughout the entire project without having to mix it again from scratch.

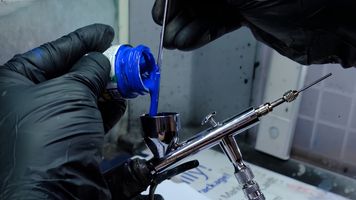
Pouring paint into an airbrush using a stir stick for neatness.Pouring paint into an airbrush using a stir stick for neatness.

Pour down a stir stick to avoid making a mess around the lip of your paint bottle. Of course, a dropper bottle alleviates this issue.

Watch the Surface

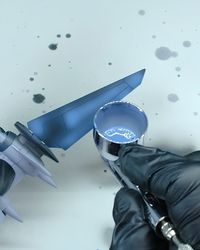
When paint hits the surface of your model, you want it to settle into a smooth, even layer. The surface may look slightly wet when the paint first lands, but it should not become soaked. If you notice a large glossy puddle beginning to form, you’re applying too much paint, so move on to another section and give that area time to dry.


One of the biggest beginner mistakes is trying to make the first coat completely opaque. You don’t need to. It’s usually better to apply multiple thin coats and gradually build the colour. Your first pass may look slightly transparent. Let the paint settle, then come back with another pass.


Building colour slowly gives the paint a chance to stick in an even layer and greatly reduces the chances of pooling, running or obscuring surface detail. Remember to watch the surface of your model for these signs.


Try not to hold the airbrush in one place while spraying. Keep your hand moving smoothly across the surface. Begin your movement, introduce paint, continue across the model, then stop the paint after stopping your hand.


This creates much cleaner and more consistent coverage. You should also try to keep the airbrush at a reasonably consistent distance from the model. Moving closer creates a smaller, more concentrated spray pattern, but also introduces paint at a higher velocity. Moving farther away gives you a wider, softer pattern. You’ll use both approaches eventually, but for basic coverage, consistency is more important than precision.

Take Your Time

Using an airbrush well takes practice. One of the hardest things for beginners to learn is simply how much paint is too much. At first, there’s a temptation to keep pulling the trigger farther back because you want to see the colour appear immediately. Try to resist that, it is better to use less paint than you think you need and simply add more later than it is to strip paint away.


Before you start working on something you care about, spend a few minutes practising. Try spraying dots & lines, try moving closer and farther away from the surface. Try pulling the trigger back slightly, then farther. Practise creating a light coat and gradually building it until it becomes opaque. A sheet of paper or scrap plastic can teach you an enormous amount about how your particular airbrush behaves, and more importantly, how your technique is progressing.

Coming Up Next

At this point, you know how to set up your airbrush, prepare your paint and actually start spraying. There’s one more skill you absolutely need before you begin painting regularly: Cleaning your airbrush!


It’s important that you watch Episode 4 and understand the cleaning process before starting your first proper painting session.

Cleaning your airbrush properly will prevent the majority of common problems beginners experience and keep your equipment working reliably.


In Episode 4, we’ll go through routine cleaning, deeper cleaning, clogs, dried paint and basic troubleshooting. Once you’ve watched that, you’ll have everything you need to start airbrushing.


Until then, happy building!

— Liam's Hobby Room × BC Hobbies


Every skill starts somewhere!

Liam's Hobby Room

More Posts

Airbrushing for Beginners 4Airbrushing for Beginners 4
Airbrushing for Beginners 4

Welcome back to my Airbrushing Course for Beginners (the blog version!), brought to you by BC Hobbies. I’m Liam and this is my hobby…blog? In this final episode of the series we’re going to cover one of the most important things you need to know about operating an airbrush:


How to clean one properly.


Cleaning is such an important part of airbrushing that I seriously considered making this the first episode. In the end, though, I think it makes more sense after you’ve built some familiarity with the tool, the paints you’re using, and how the airbrush actually operates.


A common misconception is that spraying a little thinner through your airbrush is enough to clean it. It isn’t. The real secret to cleaning an airbrush properly is understanding the type of paint you’ve been using and how that paint behaves once it begins to dry or cure. A lot of what we learned back in Episode 2 will come in handy here, but I’ll go over the important parts again as we need them.

Airbrushing for Beginners 2Airbrushing for Beginners 2
Airbrushing for Beginners 2

In Episode 1, we looked at an overview of the hobby so you could build some familiarity with the tools and general concepts involved in airbrushing. This time, we’re getting into one of the most intricate parts of the hobby: paint.


We’ll look at the main types of hobby paint, which ones are easiest for beginners, how to thin them properly, and what safety equipment you’ll need while spraying. There’s a lot of paint out there, but once you understand a few basic concepts, choosing and using it gets much easier.

Airbrushing for Beginners 1Airbrushing for Beginners 1
Airbrushing for Beginners 1

New to airbrushing? You’re in the right place. In Episode 1 of our Beginner Airbrush Course, Liam covers the basics you need before you start spraying—from choosing your first airbrush and compressor to setting up a safe workspace and understanding ventilation. Let’s get started!

<p>About This Blog</p><p>About This Blog</p>

About This Blog

A place to learn, build, and get better at the hobbies you love. We share practical tips, techniques, beginner guides, community projects, events, and helpful how-tos—with the occasional look at tools and products that can make the job easier.